Cut AI tools
AI Storyboards & Character Sheets
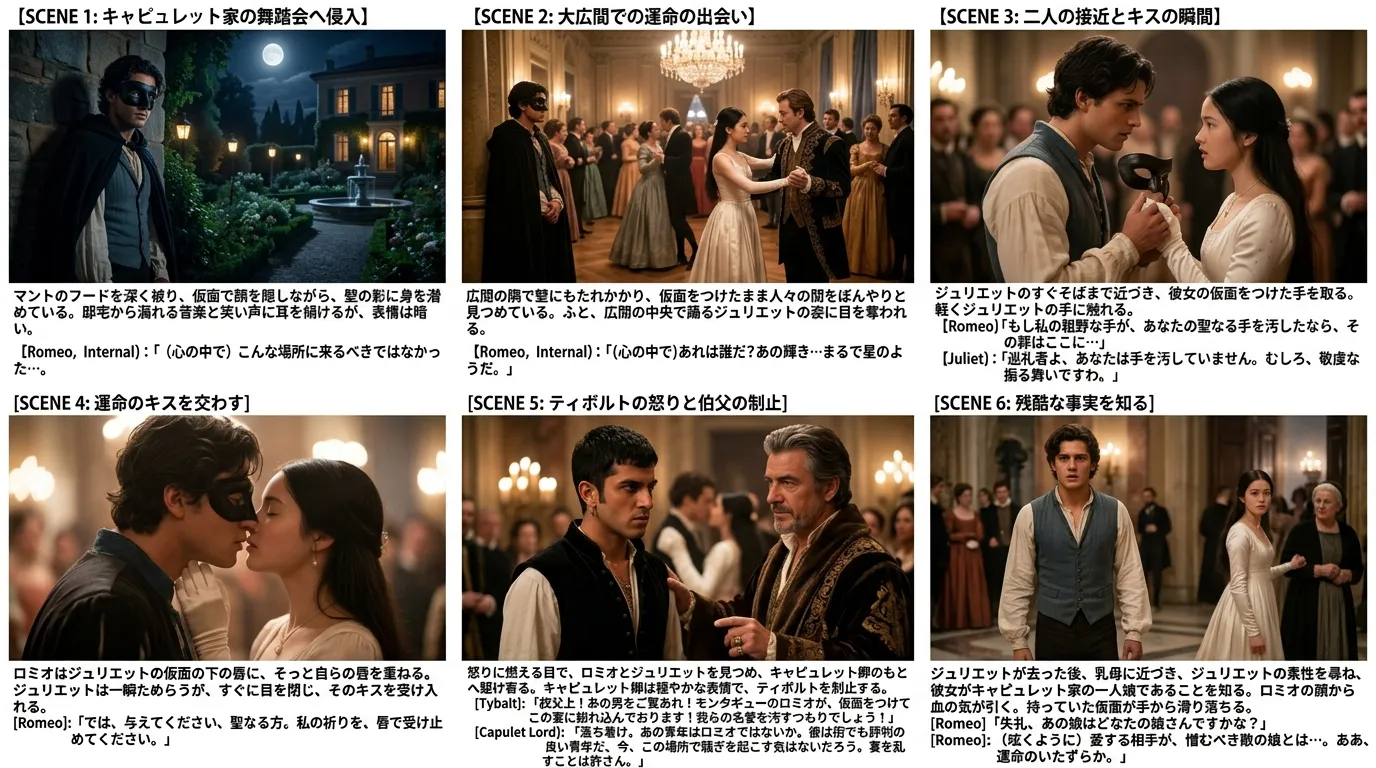
Script done—but should you commit to cut generation yet? Visualize each episode as one sheet so you see first and decide fast, before the long read.
Google Gemini builds storyboard sheets or character reference sheets from your script—panels per scene, or cast in a row. One sheet = 10 AI credits per episode fence (`-----`).
Why you don’t have to read every word first
AI scripts grow long fast. A few seconds on one episode sheet conveys tone, staging, and climax direction. Text for detail, boards for decisions—that’s the design.
Instant go / no-go
Skip the full read—one sheet per episode shows tone, drama, and cast looks so you decide fast.
See blocking and story flow
Multiple panels on one sheet—scene turns, blocking, and cut rhythm at a glance.
Complements cut generation
Bulk cuts handle Veo/Sora prompts; storyboards and character sheets sit upstream for vision sharing.
Compare versions
Premium: 2 per episode, Studio: 5. Swap after rewrites and compare before and after.
Read-through in Reader mode
Reader inserts boards after each episode fence—script and visuals alternating.
Film strip on mobile
Scroll EP1, EP2… above the script. Tap fullscreen; rotate for detail on the go.
Character sheets
Horizontal cast reference—share who looks like what, especially in cinematic or live-action styles.
One episode = one storyboard sheet
Production-style layout—scene titles, action, dialogue in panels. Lightweight 1K WebP prioritizes overview over fine print.
Four visual styles to compare
Switch styles per episode in “+ Gen”. Color/Sketch for rough sharing; Cinematic/Live-action to judge the finished look. Compare 2–3 at 10 credits each.
Color (Anime)
Manga-inspired tone
Sketch
Pencil rough
Cinematic
Film lighting & texture
Live-action
Photorealistic
Horizontal cast reference per episode—share who looks like what on one sheet. Generate before storyboards for better consistency.

- 1Film strip “+ Gen” → choose “Character sheet”
- 2Pick style and generate (10 credits)
- 3Preview → save (Premium 2 / Studio 5 per episode)
Three places you’ll use it
- Film strip: Above the script—EP thumbnails and “+ Gen”. Pick type and style.
- Fullscreen viewer: Move across episodes and versions; controls never block the art.
- Reader mode: Inline after each fence (default ON). Read-through before you commit.
Then: cut generation
Once boards say “yes, shoot this,” proceed with bulk or single cut generation. Entering cuts with the big picture clear cuts rework.
Jump to bulk cut generation →Why Premium / Studio
Costly image APIs (10 credits/sheet), but they compress hours of reading and doubt into one visual. Ideal for script → boards → cuts end to end.
Bulk-generate cut prompts from the full script
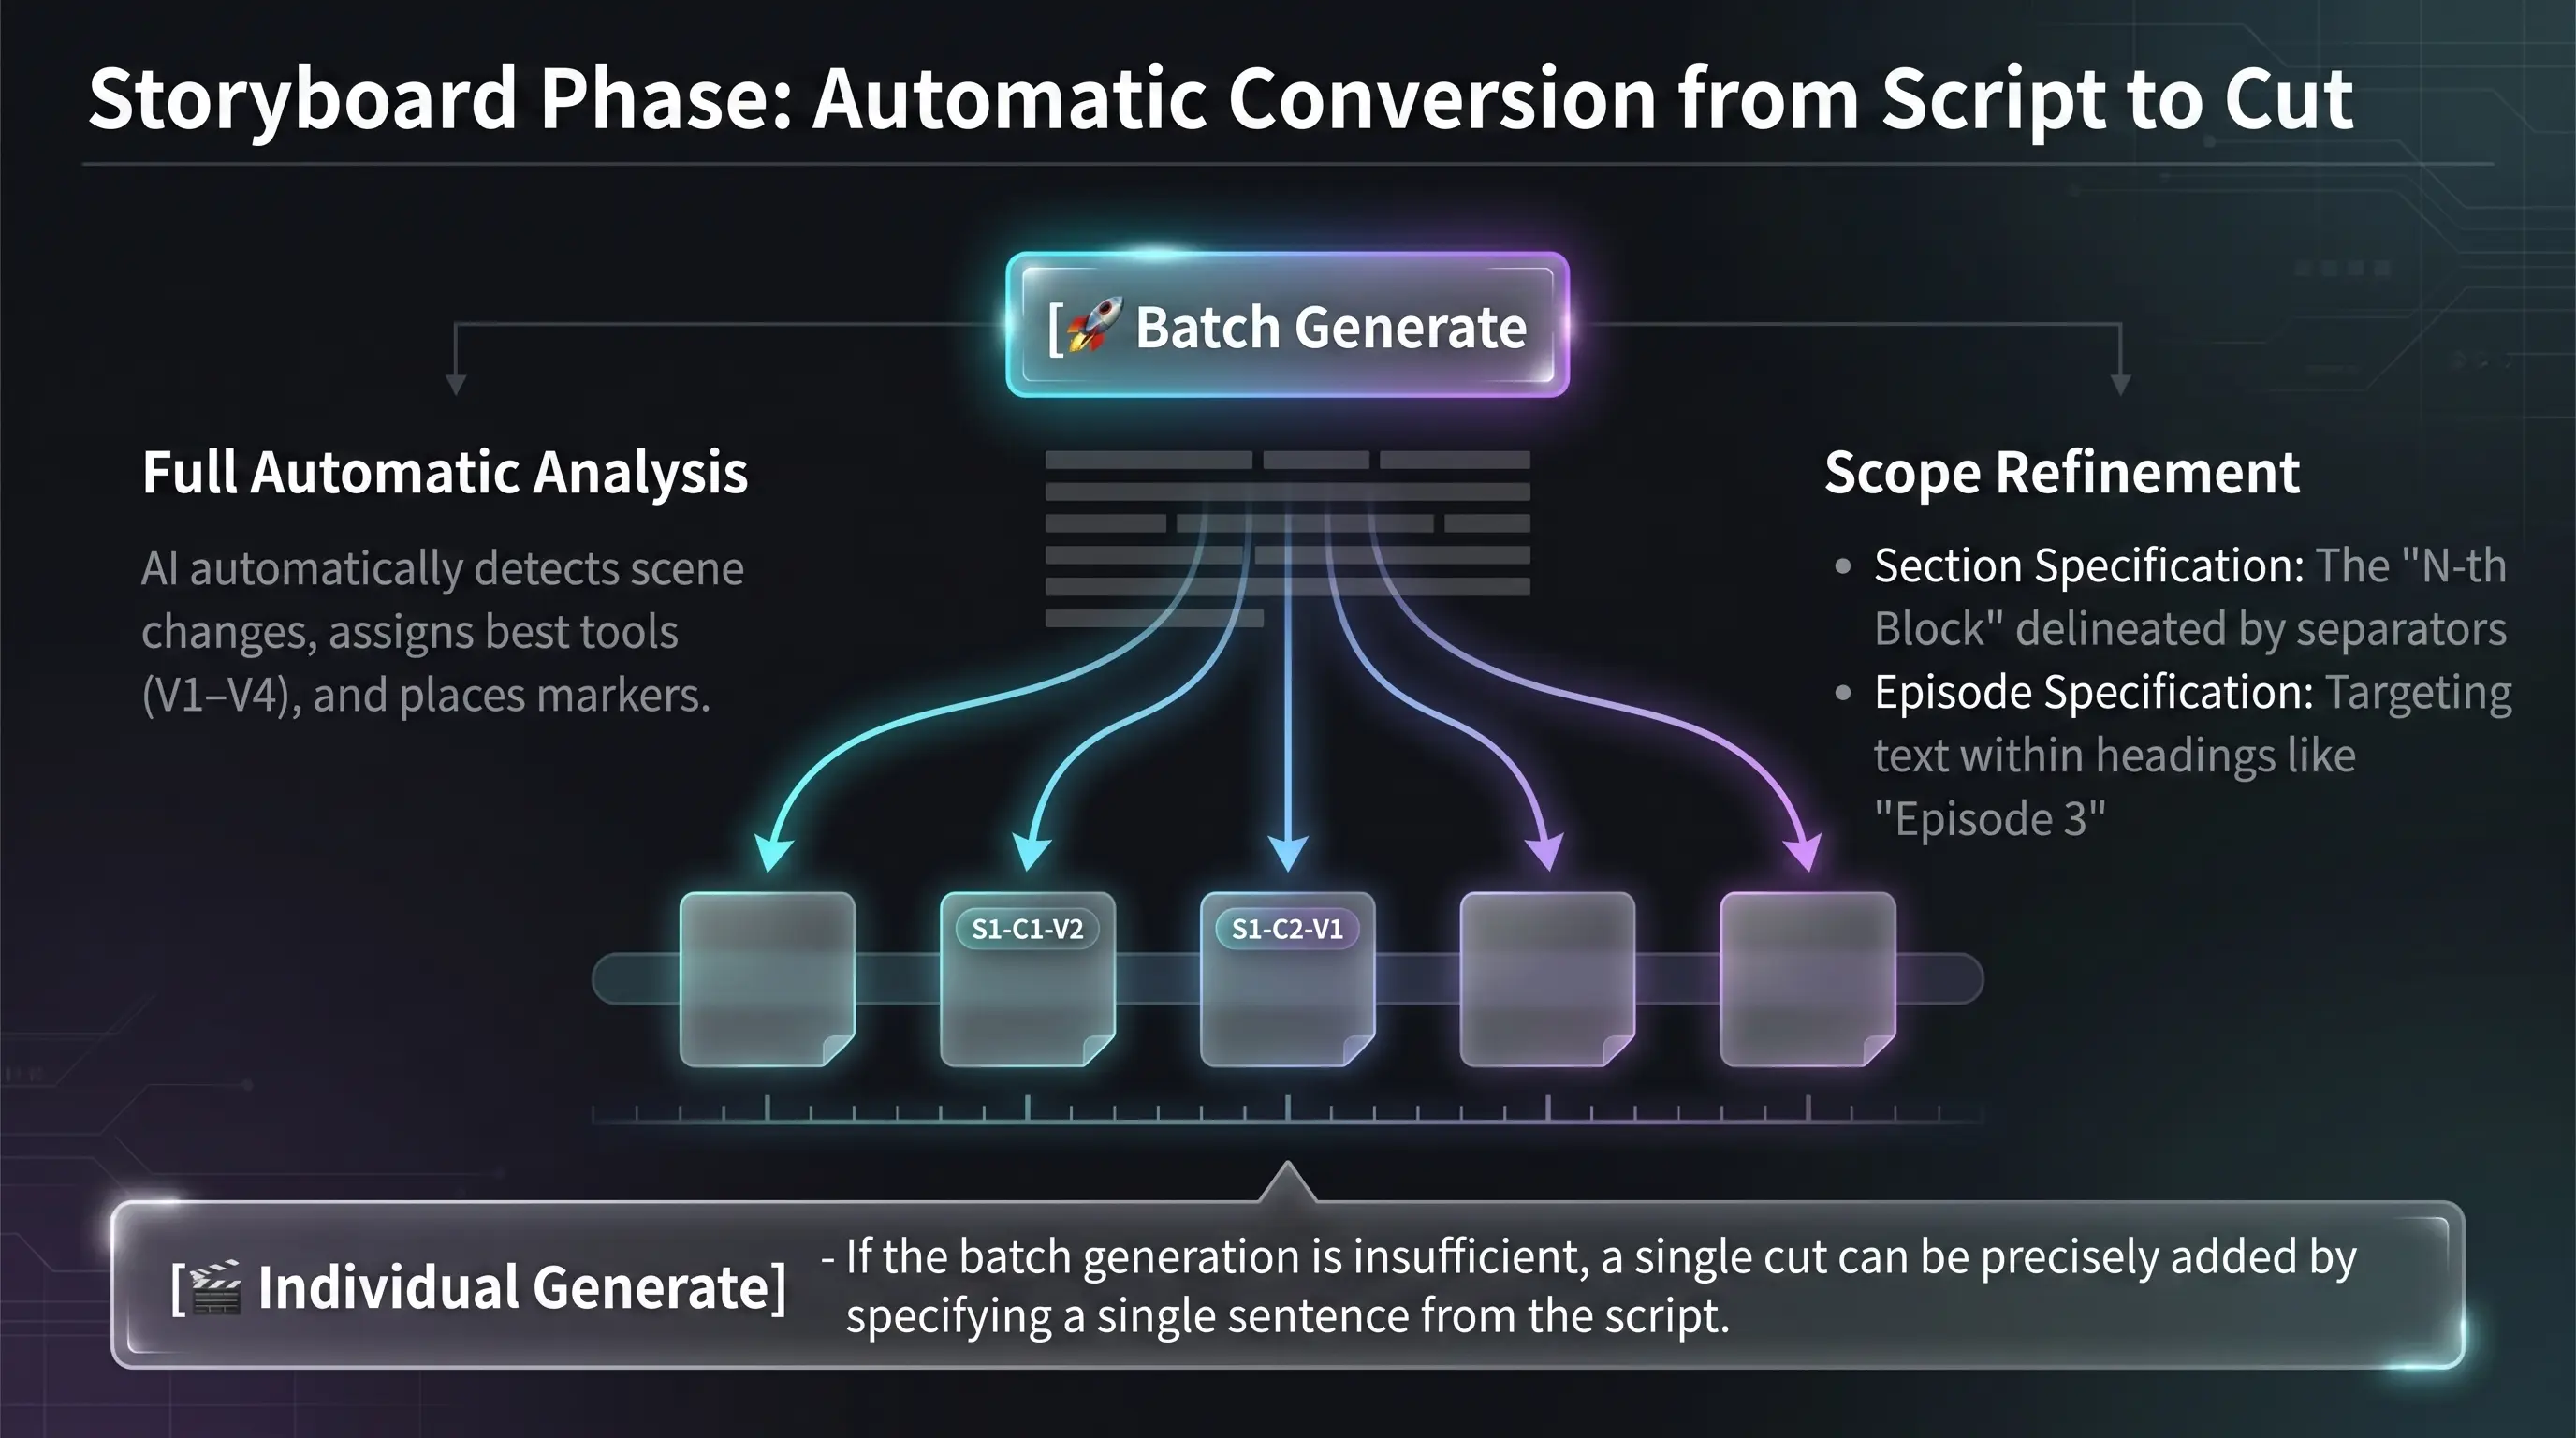
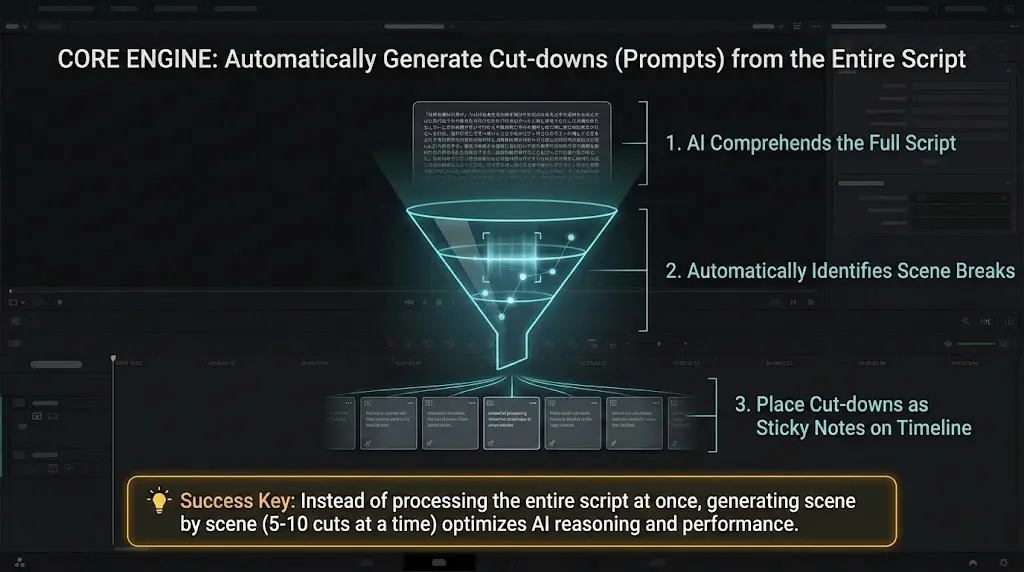
AI reads the full script, infers scene changes, and bulk-generates cut stickies. This is Director’s Console’s flagship AI workflow.
If you run **without narrowing scope**, the **entire script** is cut-listed in one go. That can **consume many prompts** (for example **50+** in a single run)—especially on long scripts.
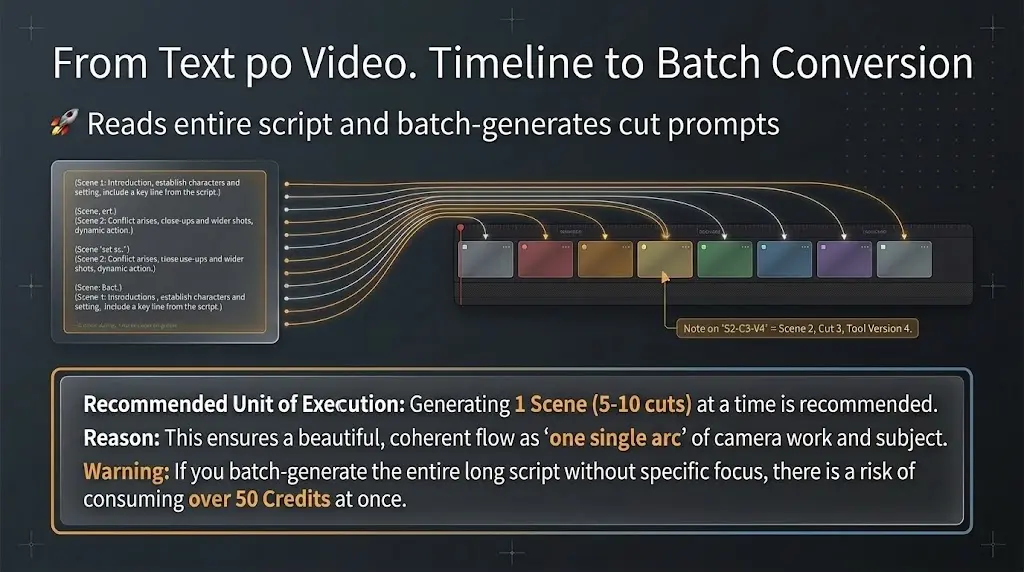
We recommend bulk-generating in **chunks of about 5–10 cuts per scene**. Treat each scene as **one continuous arc** (camera, framing, blocking continuity)—**doing so** aligns better with how the model reasons.
In the **bulk cut-generate** panel, use **+ Choose…** to target **🚩** scene blocks line-by-line.
If the tone or characters feel off after a run, **revise the script** or **start a fresh project**—usually faster than forcing bad cuts forward.
Downstream **video generation** is often expensive. Try **just the first few cuts** as video, decide whether to continue the piece **after you see pixels**—that saves both **video spend** and **prompt usage** in Director’s Console.
If scene numbers / **🚩** headings are missing or inconsistent, open **Rewrite entire script** (📝) and run the quick chip **“Align headings to the numbered format”** before bulk generation—much easier for the model to interpret.
How to Use
Polish the script first (prep)
Bulk cut generation **reads your whole script**, so **polish the script first**. After **Generate scripts & stories with AI**, keep asking for edits in plain language until the story and characters feel right, then use **quick chips** to deepen premise, background, extras, and other blocks—**raise information density before cut-listing.** For handwritten scripts too, following the **sample script format** makes **cut-generation quality** easier to keep stable.
Click "Bulk Generate"
Click the button at the top of the script area. The button is disabled when the script is empty.
Configure in the bulk generate panel
You can bulk-generate **cuts for every scene** at once, but we recommend generating **one scene at a time** with clear instructions (**without a tight scope you may spend 50+ credits**). Aim for about **5–10 cuts per scene**; design each scene as **one continuous arc** (camera moves, framing, and blocking) so inference stays coherent. Treat **max cuts** as a rough guide—you may sometimes get more than the number you pick. You can also insert boilerplate via **Extra instructions** or the **pill buttons**. **Tip:** do not lean too hard on quick chips during bulk runs; **batch-tidy after generation** is often the smoother path.
Cut stickies are auto-placed
Once executed, AI-generated cut stickies are automatically placed on the timeline. Each cut is linked to the corresponding part of the script. Script and timeline positions can drift—**right-click** (on mobile, **long-press**) to move a cut manually.
Automatic Tool Version Selection
AI cut generation
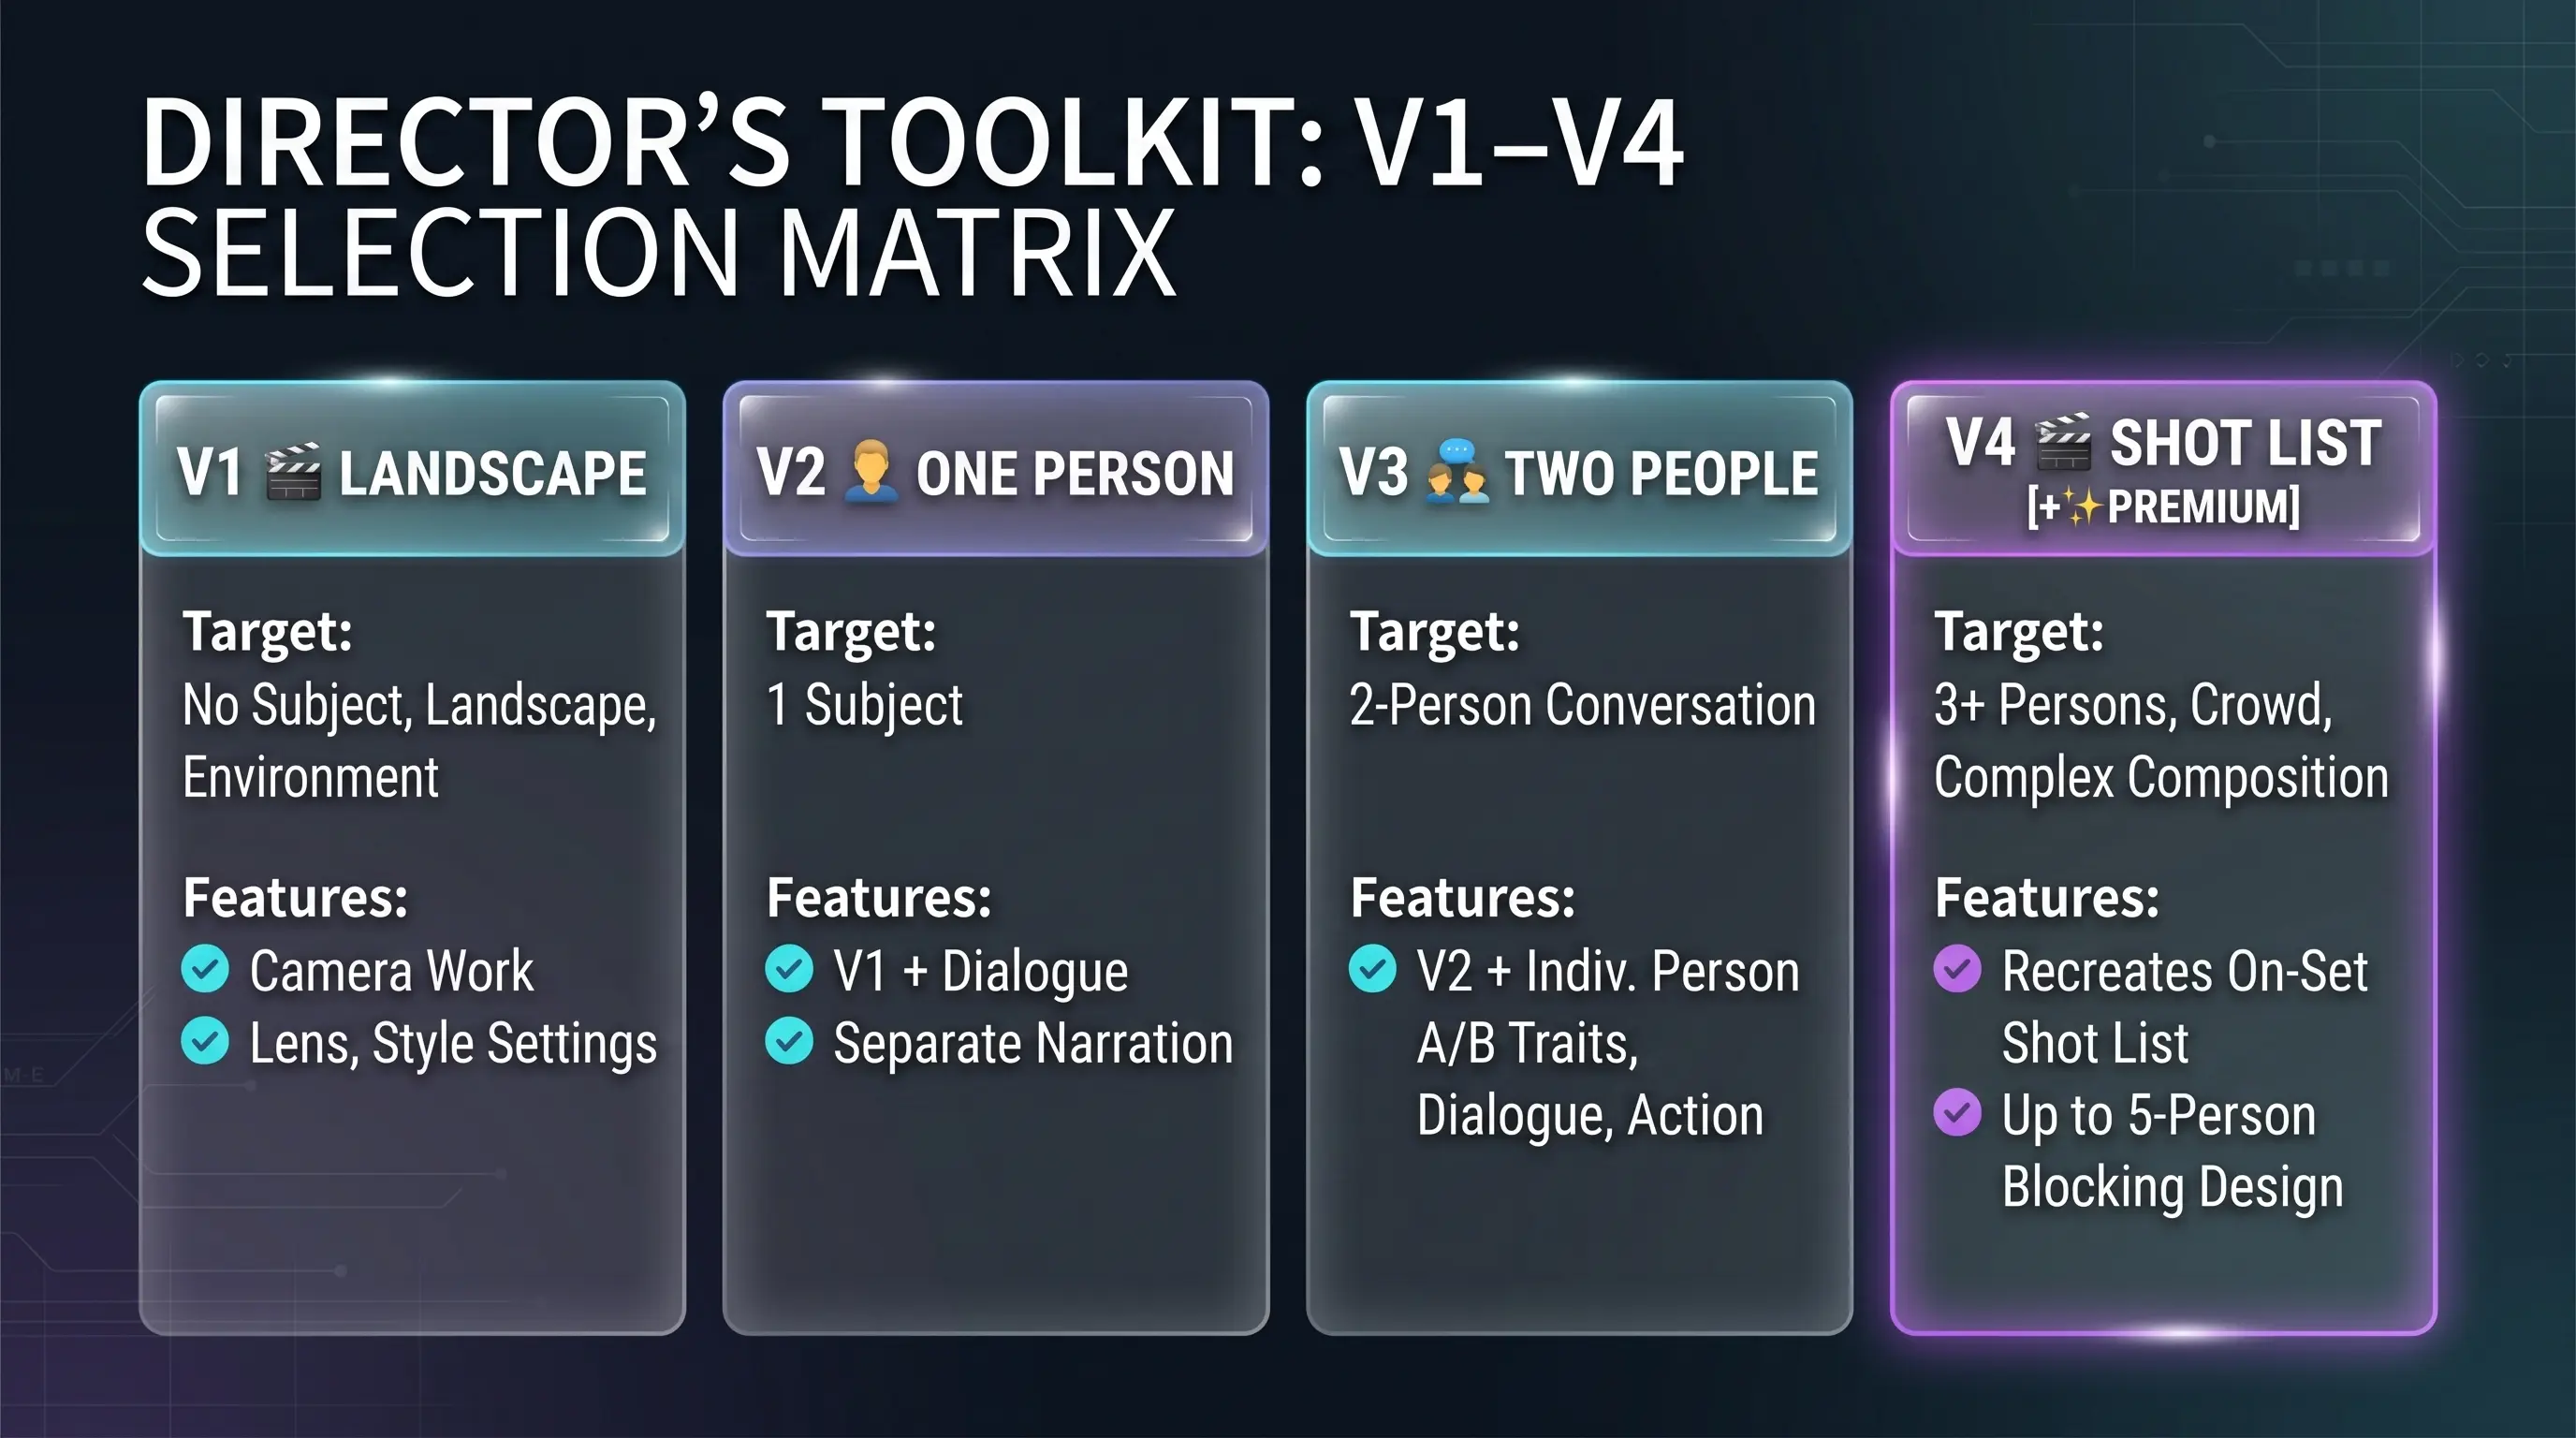
When generating cuts, the AI reads your script and picks the best V1–V4 version for headcount and blocking in each shot.
Premium: prioritize V4
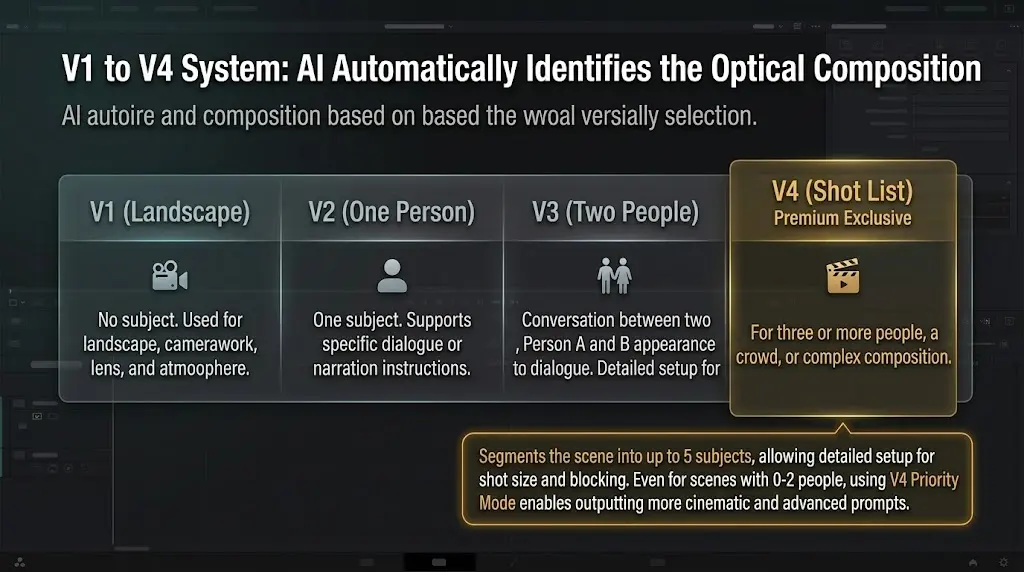
On **bulk**, **single**, **cut AI**, and **bulk cut AI** confirmations, **Premium** (and up) can choose **Auto** or **Prioritize V4**. By default movie cuts lean toward **V4 (shotlist)**; **no-subject** shots stay **V1 (scenery)**. **V4** supports detailed blocking, camera, sound, and props, so it works well for **zero-to-two** on-screen subjects. On **Premium**, producing everything in **V4** is also an option—and often the best-balanced choice.
For scenes without subjects or landscape cuts. Designs camera work, lens, atmosphere, and style.
For cuts with a single subject. Optional dialogue plus separate narration field.
For cuts with two characters in dialogue. Sets appearance and lines for both Person A and Person B.
For 3+ people, crowds, and complex shots. Up to five subjects plus shot size, blocking, and more.
V4 Shotlist — Crowds & 3+ people, one cut at a time

Think **shotlist-style** like on set: enter *who is where* and *what the camera shows* as separate pieces. **More parameters** than V1–V3, so you can use it for **0–2 subject** cuts too—and we recommend it.
Select V4 in the toolbar
In the movie editor toolbar, click **V4** (Shotlist) next to V1–V3. **Premium** feature.
Place a sticky on the timeline
Turn on the timeline and place a sticky where this shot belongs in the script—same as other tools.
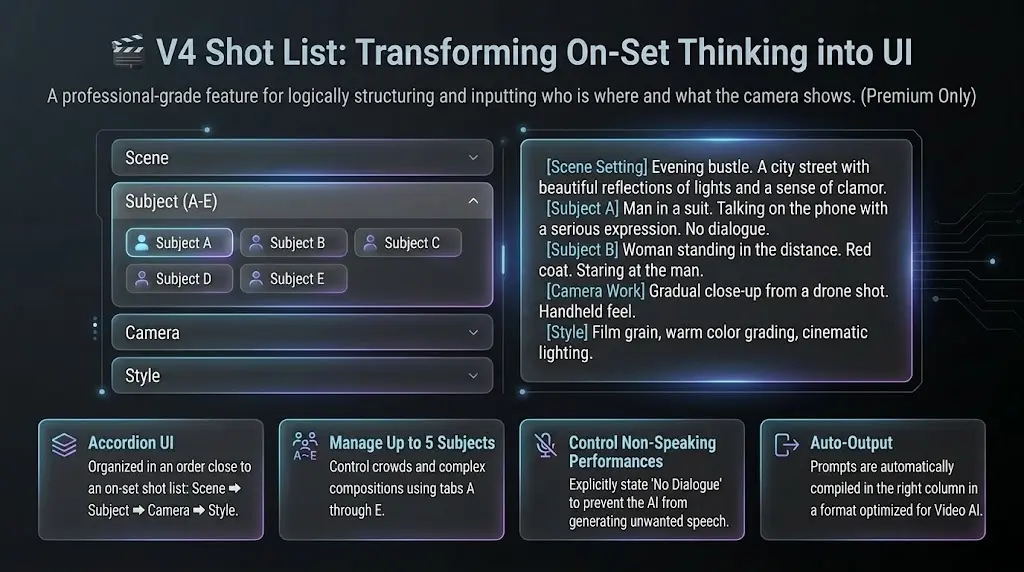
Fill accordions and subject tabs
The center column uses **accordions** and tabs: **Scene** → **Subjects (tabs A–E)** → **Camera** (shot size, angle, focus…) → **Style & art**—like a real shotlist. Leave unused subject tabs empty.
Check the built prompt on the right
The right column assembles **【Category】 + text** lines so detailed directions read clearly for video AI.
💡 Good to know
- ▸**No dialogue** is written as “None” / “なし” so silent performances are less likely to get random lines from the generator.
- ▸**Bulk generation** may pick **V4** automatically when the script has three or more people, crowds, or complex blocking.
- ▸Up to **five subjects (A–E)**—great for hallways with three people, parties, or layered blocking.
How to read timeline sticky labels
Cut stickies from AI bulk or AI single use a wide label (e.g. S2-C3-V3 or S2-C3-V4). S is the script scene index: use N from [Scene N — ART, LIGHTING, BACKGROUND & EXTRAS], including older 🚩 [Scene N — ART…] headings with the same N. Do not take N from 🚩 [Scene N — situational premise] for S. C is the cut index inside that scene. The trailing V3 / V4 is the tool version (V4 = shotlist for three or more people).
If the script uses fence lines (only long runs of ー or -) between episodes, labels may start with EP (e.g. EP2-S1-C3-V2). A single block without episode fences usually looks like S2-C3-V4 without EP.
Manually placed stickies, or older data created before labels existed, may stay as small badges showing only V1 / V2 / V3 / V4.
**Hover** a sticky to see a tooltip: label, cut title, camera work, the **start of the scene line**, and more—handy when you refer to a specific cut.
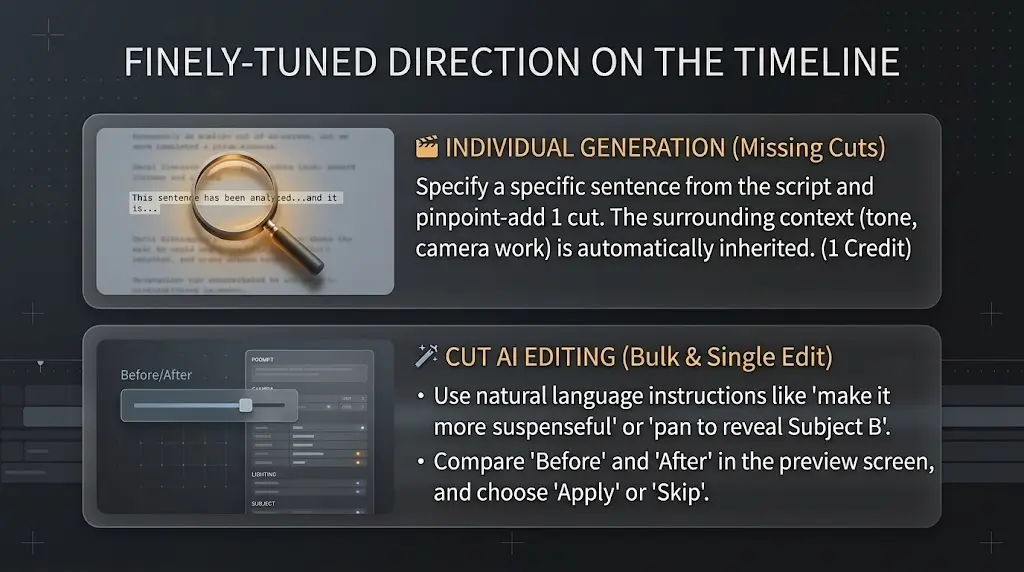
Fill gaps: generate individual cuts from script lines
Generate a single cut by specifying a particular part of the script. Useful when you want to add missing cuts after bulk generation, or create a cut for a specific scene.
If your **free plan** includes the **limited-time 10 credits**, using **single-cut generation** here little by little lets you try more with them.
How to Use
Click "AI Single Generate"
Click the button at the top of the center column form. Available regardless of sticky selection.
Enter the target text
Specify which part of the script the cut corresponds to. Enter the target text in the expanded field or select a range from the script preview. For dialogue scenes, copy-paste the line(s) you want for that cut, then generate.
AI generates one cut
AI references the full script and character details to generate one optimal cut for the specified section. Consistency with surrounding cuts is also considered.
Review and add as a sticky
The generated result is auto-filled into the form. You can review and fine-tune before creating a sticky.
💡 Information from surrounding cuts is automatically passed to AI, maintaining consistency in tone, camera work, and timeline.
Bulk AI refine of cut prompts
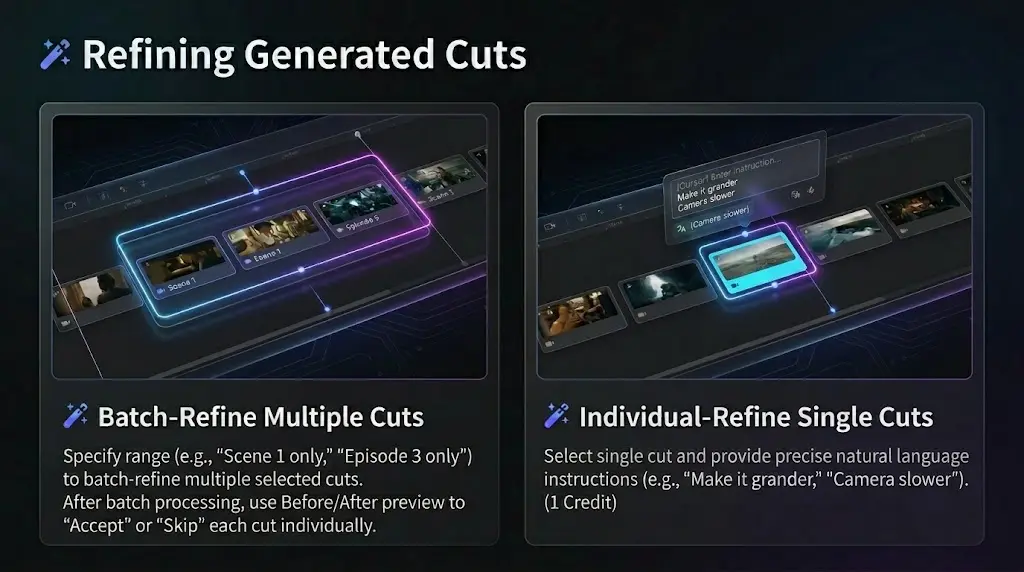
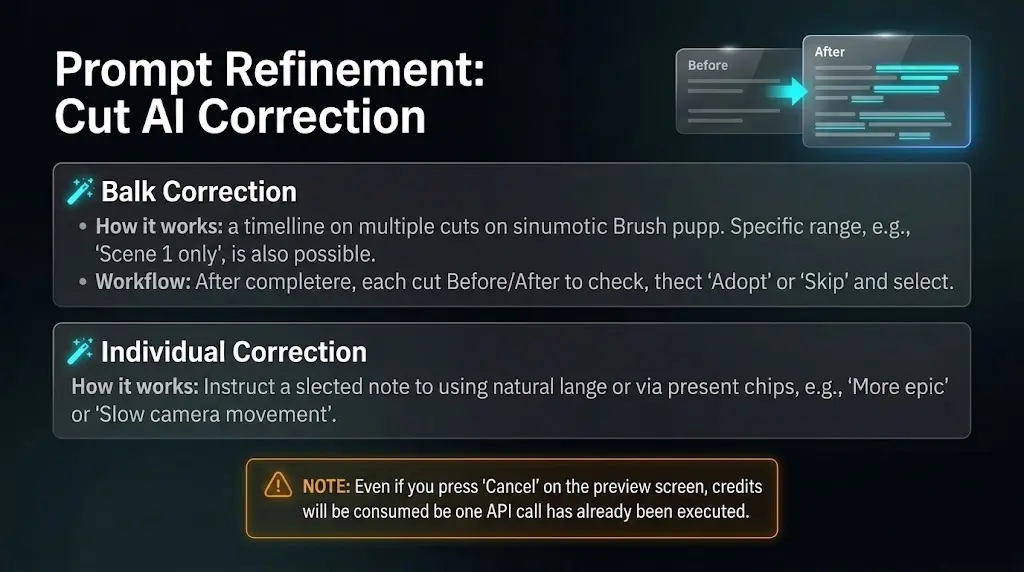
Brush up cut stickies on the timeline against your script in one go. One instruction can refine multiple cuts; after the run, review each cut in a preview and choose apply or skip.
How to Use
Have cut stickies ready
Bulk cut refine targets stickies. The modal won’t open if there are none.
Click “🪄 Bulk refine”
In the left column, open the lower script toolbar row and click 🪄 Bulk refine.
Enter instructions and run
In the bulk panel, pick the cuts to refine and enter instructions. Start with plain language (e.g. “more specific subject acting—verbs in detail”), then use quick chips on the text chips to raise information density.
Per-cut preview: apply or skip
After the run, review each cut’s Before/After and choose apply-and-next or skip. Ending the preview leaves unreviewed cuts unchanged.
Compared to single-cut AI refine
Bulk refine processes many cuts with one instruction; **credits follow how many cuts the AI returns (min 1 on success even if zero returned; failures such as timeouts still cost 1 credit per request).** Single refine targets one selected sticky from the center column’s AI Refine button and uses 1 prompt.
Individual AI refine of cut prompts
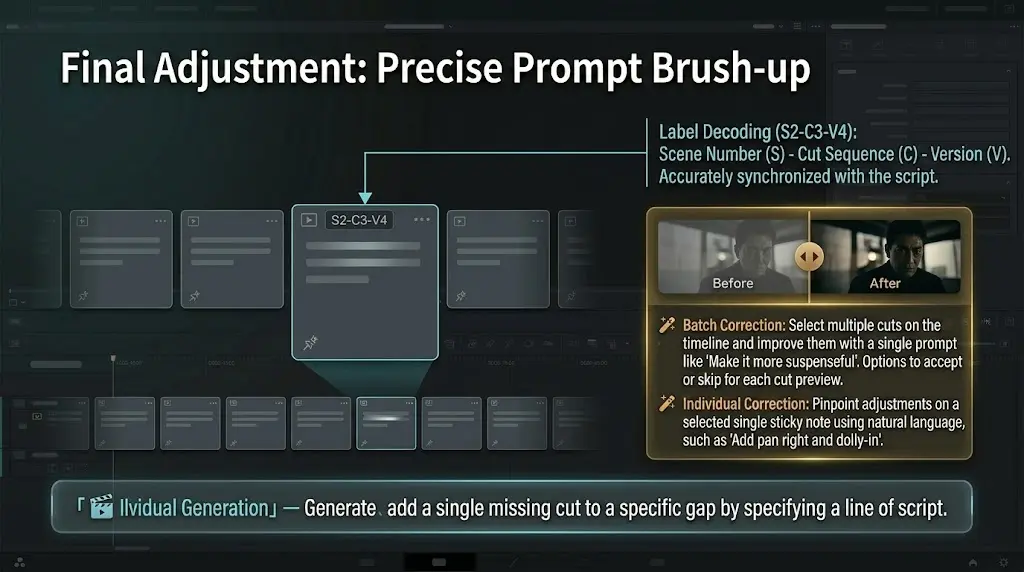
Improve one selected cut sticky with AI suggestions. Give instructions in plain language—for example: “Pan left and dolly in to catch subject B, and adjust blocking to match,” or “make this cut feel more suspenseful.”
How to Use
Select the sticky to modify
Click a sticky on the timeline to select it. Alternatively, right-click a sticky and choose "AI Refine" from the context menu.
Click the "AI Refine" button
Click the button at the top of the center column form. Disabled when no sticky is selected.
Enter your refinement instructions
Enter instructions in the expanded field. Write freely or use preset chips ("shorten", "add detail", "more emotion", "cinematic", etc.).
Review the Before/After preview
The AI-generated revision is displayed alongside the original data. You can review the changes.
Click "Apply" to confirm
If the revision looks good, click "Apply". Click "Cancel" to keep the original data.
Before / After
Compare original and revised data side by side. Form data remains unchanged until you click "Apply", so you can review with confidence.
Continue your script with AI
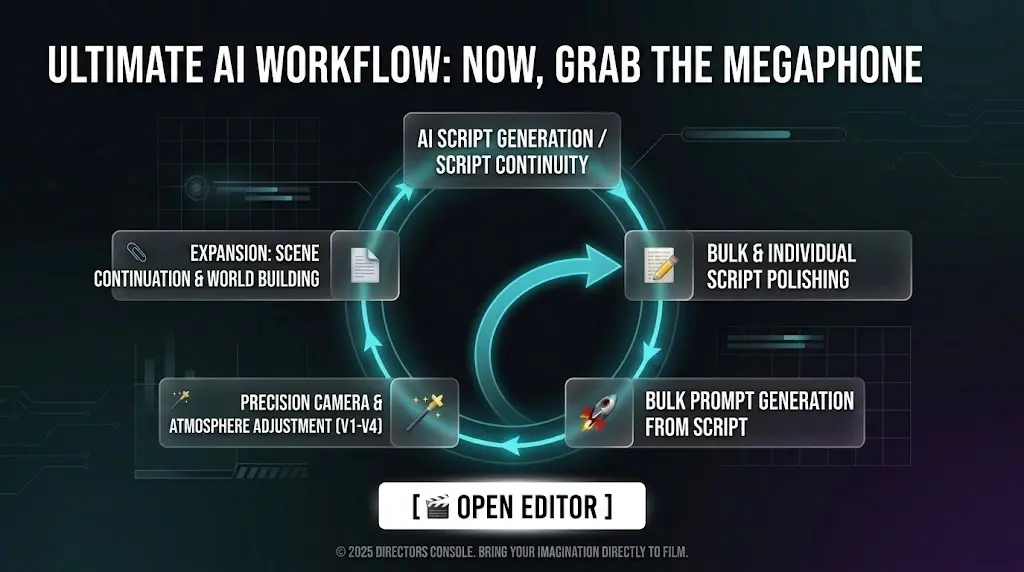
AI writes what comes next in your open script, guided by options you choose. Unlike scratch generation (📓 Script), it extends your story — episode 2, the next chapter, or a follow-up CM beat — without replacing the file; new text is appended at the end.
Screenwriter-style options
Set where you continue from, what happens next, tension, how this stretch ends, how it opens, and director notes — all in one modal.
Movie & CM
Switch tabs in the modal. For CM, product, selling points, and duration from the Script modal’s CM tab feed the continuation.
Credits
Continuations use 1–4 credits by volume (Short through Extensive), same as scratch script generation.
How to Use
Click “📎 Next” / 続き
In the movie editor’s left column, under the script toolbar, click 📎 Next (or 続き). Requires a non-empty script and login.
Choose Movie or CM & set options
In the modal, pick the tab. Choose where Part 1 ends (full script end or text marker), optional tail-only context for long scripts, plus beats, tension, ending, bridge, and freeform notes.
Generate & append
Run Generate continuation. Text is concatenated to your script. If you used a mid-script marker, the new part is inserted after that point and any text that followed the marker stays after the new block.
VISUALWhat the continuation block looks like
A separator line and heading are added at the start so you can spot new material at a glance (wording depends on language).
----------------
[CONTINUATION / NEXT PART]

(New stage directions & scenes follow…)Continuation does not create cuts (stickies). Use your appended script with 🚀 Bulk or 🎬 Single generation as usual.